
Every week on Metalsmith Society I explore a different tool used in jewelry making for #tooltalktuesday! It has been a wonderful opportunity to deep dive into different tools and discuss with members of our community! Some of these posts are sponsored, without this support the page would not continue to run daily. So thank to all of the sponsors in 2020, when you purchase from them you are supporting the page! Here is my list of the top nine #tooltalktuesday posts of 2020:
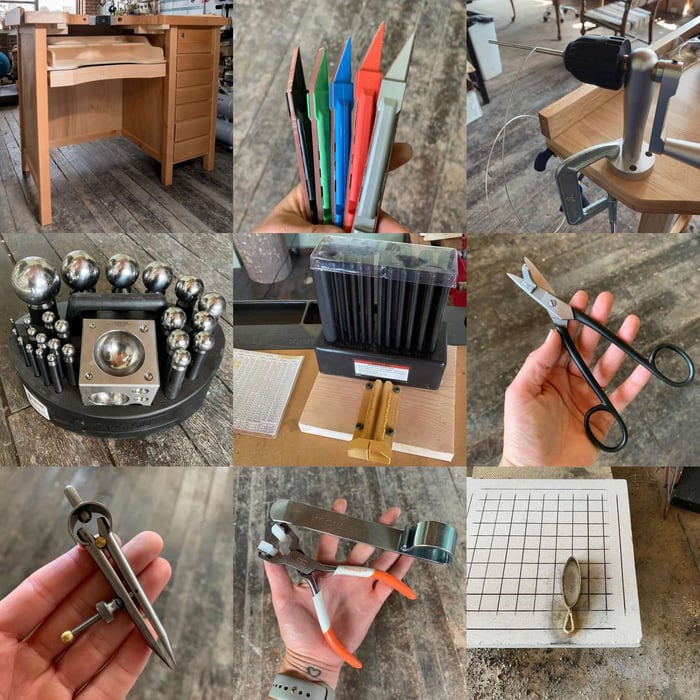
Custom John Frei Bench From Otto Frei

My John Frei Custom Workbench which was created for me, by @ottofrei1930 😭It is so amazing I’ve actually been worrying this post would not fully do it justice but here it goes. This bench started with a solid 1-1/2" thick butcher-block top made of select grade maple. The legs, top trim, bottom trim, drawer faces, face frames and arm supports are solid wood and the side and back panels are made of cabinetmaker quality maple-veneered plywood and look beautiful. It is the sturdiest, most gorgeous bench I’ve ever laid eyes on! They are made in Chico, California start to finish by professional cabinetmakers. If you get one of these benches it’s game-over, you have a bench that will last a lifetime and be passed on to another jeweler. An heirloom!
Purchase the bench here. Be sure to use code MMSOF.
Excel Blades Sanding Sticks

These are my go-to for cleaning up excess solder around a tight space. The sticks come in grits 80-600 (I have grits 120-600 in the photos) and they each have a rotating belt of sand paper (which is replaceable). What I like is when I get a small lump of solder where I don’t want it, this works quickly but isn’t so strong that I’m easily scratching my piece (which can sometimes happen with a mini file, or a flexshaft bit that rapidly removes material.) The tip of it is rounded so it gets right next to my solder seam. I try to move the stick around so I don’t get any deep scratches. They are so handy to have! The sticks come in different colors as well so I know which one I need to grab.
Purchase the sticks here. Use code METALSMITHSOCIETY
Jump Ring Maker By Pepe Tools

This @pepetools_usa Jump Ring Maker, which works with my Foredom Flexshaft to create jump rings fast! It has three main parts: a mandrel base which you use to create coils, a cutting box that holds the coil and a hand piece holder with blade that is used with your Foredom H.30 hand piece to cut the coils into jump rings. You will need to mount the mandrel holder and cutting box but you have options! For the mandrel holder I use a c-clamp, this allows me to pack it up when not in use in my small studio. The cutting box I mounted to a piece of wood (which took me two minutes to saw and drill) and then I clamp it with a Irwin Quick Grip Clamp (purchased at my local hardware.) You can also hold it in a vise if you have one. Or mount these items directly to your bench if you have the space! Using the mandrel base is super easy, you pick a wire and mandrel and create your coil. It comes with 20 mandrels sizes 2.5-12mm. In order to keep your jump rings from going everywhere, tape the bottom of your coil! Lubricate the top before placing it in the cutting box. It’s important not to over tighten the screws on the cutting box so I like to look at it from the side to make sure it’s secure but even. Next you set up your blade in the mandrel and place your hand piece in the protective holder. There is a line to help you make sure your blade is in the proper position. Lubricate your blade before you cut. PUT ON YOUR SAFETY GLASSES. Now you’re ready to cut: place the blade in the cutting box, place one hand on the hand piece and the other over the protective shield so it stays level, run your flex shaft at top speed and guide it down as it cuts. Speed is important! Doing it half heartedly or hesitantly can result in a little smoke or it getting jammed either of which is no big deal but it’s not the ideal, smooth cutting experience this thing is capable of! Once you cut you have beautiful jump rings!
Durston Dapping Set

Durston's 24 Piece Doming Set includes a dapping block and carry case! For those completely new to dapping blocks they are an essential tool for doming metal. In my demo I took a 1” circle and made it into a cup, this is done by striking it into the dapping block and annealing in-between hammering into the smaller parts of the block. This is just the start of what you can do with this, you can saw designs and shapes prior to doming or use the tiniest domes for design elements. It’s a great forming tool. We have also shared some great tips with it over the years, for example it is awesome for making ring bands or thick jump rings perfectly circular by giving them a few strikes inside the dapping block. I probably use mine the most often for that purpose.
You can purchase the Dapping Set from Otto Frei and use code MMSOF. Or purchase from Durston directly where you can also save using code MSSDT.
Jump Ring Maker By David Lee Smith

The Jump Ring Maker Kit - With 28 Coiling Dowels created by our friend @silversmithingretreat this kit is $39.95 and all you need is a variable speed power drill (to slowly wind your wire onto the dowels) to create your jump rings. Once you create your coil you use the Cutting Guide to saw it. SET UP: It took me about five minutes to cut a piece of wood and mount the Cutting Guide. I then use a C-clamp to attach it to my bench, that way I can store it when it is not in use. When mounting the Cutting Guide, whether it’s to a piece of wood or your bench make sure the slot for cutting is hanging off the end. Once you have that set up all you do is pick a dowel, insert it into your variable speed power drill and then create your coil. I like to create a little 90 degree bend in the wire, and place it next to the dowel in the chuck collet and then I slowly wind. Bonus tip: Variable speed power drills are also amazing for twisting wire as you can go slow. You then want to thread your coil onto your saw blade. I think cutting coils takes a little bit of practice and there are some things you can do to set yourself up for success. First use a brand new saw blade and choose an appropriate saw blade for the gauge of wire you are cutting (for example I use a 1/0 for this 19g wire) also be sure to lubricate your blade. I didn’t do this but am thinking of it as I write this, you can slap a piece of painter’s tape on your coil, it would have prevented the jump rings from falling off. Be patient as you cut :) I always found the last jump ring or two stayed connected and I just finished them with a flush cutter. All in all I think this is a great, reasonably priced option if you’d like some support for cutting jump rings.
Whaley Bezel Shears

The Whaley Precision Bezel Cutting 90 Degree Shears I got from @ottofrei1930 are essentially solder shears that have been modified so that you can quickly cut your bezels with a nice 90 edge. As someone who definitely tends to trim bezel wire crooked this shear does make it quick and precise. If you don’t cut a ton of bezel wires or you find it pretty easy to get it super straight this specialty tool probably isn’t for you however If you’re someone who constantly cuts bezel wire you may find this super handy! It will save you time with your production.
You can purchase the shears here from Otto Frei. Use code MMSOF.
Tungsten Dividers from Otto Frei

I wanted to talk about a tool that is on my list of essential tools for jewelers: DIVIDERS. Dividers are useful for a ton of tasks but here I demonstrate how they help me achieve a nice border for my stamps lines. I LOVE this pair from @ottofrei1930 their Tungsten Dividers, made in the USA (item 135.081) the price point is great at $79, they are sturdy and won’t flex while you work (like some of the economy dividers out there) This is one of those tools that most jewelers don’t need to buy the most expensive version but I think it’s really worth it to invest in a SOLID pair. The tungsten carbide inserts are built for a very long working life and the knurled opener is smooth and opens easily. Also great when you can support tool makers in the USA.
You can purchase the dividers here from Otto Frei use code MMSOF.
Bracelet Bending Bar and Pliers

The @impressart Bracelet Bending Bar and Bracelet Bending Pliers are tools you can use to bend cuffs made out of wire or sheet. For someone wanting to give their bracelets a consistent shape, they work nicely. The bending pliers are awesome! I have already used them for other things besides bracelets. I like their wider jaws and the nylon prevents marring. It’s an awesome set together!!
Grid Soldering Board

Grid Soldering Boards from @silversmithingretreat these boards are asbestos-free, flame resistant hard soldering boards that can withstand up to 1800F. They provides excellent heat reflection and rapid cool down. They can be great for soldering ear posts, bails and other small elements. They do not flake, can be sanded, cut, carved, drilled or shaped for holding parts. A popular tip we’ve shown in the past is using steel T pins in these boards to prop and hold items, or even drilling directly into this board and then sticking prongs into the board to solder all at once. They can be used with metal clays and in kiln’s as shelves, (up to 927 degrees centigrade). The grid is a very helpful visual for making sure things are properly aligned and help you prevent soldering something crooked (we’ve all been there 🙋♀️😂) David marked these in half inch increments and its just a few bucks more to get the board with the grid but if you want to do it yourself he also sells plain ones!
Thank you so much for tuning in every week for #tooltalktuesday! If you have a tool you would love to see covered please comment below, or let me know on Instagram! If you are looking for other tool recommendations please visit my #TOOLTALKTUESDAY page!